Learnings From
Creating Digital Signage Apps with HTML5 & JavaScript
In this article, I would like to share my experience in developing a JavaScript single-page application for a BrightSign Digital Signage player.
I will describe the process of setting up the development environment, as well as some pitfalls to watch out for while developing for a rather low-spec device. Apart from the setup process and some player-specific limitations, this is applicable to other Chrome-based devices.
As English is not my native language, I have used DeepL Write and ChatGPT to rewrite the text for better readability and understandability.
TLDR
- test on real device
- use same Chrome version as device
- use Chrome remote debugger
- throttle CPU in Chrome dev tools
- check for memory leaks
- check GPU memory usage
- use
requestAnimationFrame where usable
- delay oprations after a transition can lead to a smoother experience
- use native video playback (hwz)
- content as images in a scroll container may work if not larger than 16.000px
- work with throttle and delay function calls
- always use remove, cancel events
Table of Content
- Why BrightSign Digital Signage Player
- Setup the Player
- Setup Development Environment
- Create a new App
- Chrome Remote Debugging
- General Development Learnings
- Performance
- GPU Limitations
- Memory Leaks
- Final Thoughts
Why Digital Signage Player
There are several benefits to using dedicated digital signage players, such as:
- 24/7 operation
- passive cooling (no fans)
- tolerance of cold restarts (e.g. unplugging the power cable)
- easy setup and deployment via a prepared SD card
- out-of-the-box support for touch screens
- GPIO for hardware buttons
- built-in software for managing content over local networks or the internet.
While there are other players available, BrightSign has a good reputation among my clients in the art space, who refer to it as "it just works." Deployment is as easy as sending a prepared SD card to the client (where cloud deployment is usually not an option). Additionally, BrightSign's technical support is excellent. I plan to try out other alternatives, though. The Gekartel POS-Box (only in german) looks promising.
However, it's important to note that these devices are not primarily designed for HTML5 JavaScript single-page applications. Their main focus is on displaying images and videos and creating interfaces with their author software, which may explain some of the limitations mentioned in GPU Limitations.
Setup BrightSign Player
Before starting, you'll need to set up the player. You can create the required setup files using the BrightAuthor:connected software. The setup process is well documented in their Player Setup documentation.
Setup Development Environment
For development, I use the Local File Network publishing method, which allows me to publish the app via a local network connection (e.g., a network cable from the computer to the device). Additionally, it's important to enable the Diagnostic Web Server for easy access to player informations and logs.

Create device setup in BrightAuthor:connected.
It's a good idea to update the firmware to the latest version before beginning development, as this can affect the player's Chrome version (be sure to check the release notes). The firmware update can be easily done as part of the device setup process by enabling BrightSign OS Update in the right column.
The final step is to save the setup files to an SD card that is formatted as FAT32 or exFAT, insert it into the player, and boot the device. Once the player setup is complete, you can open the diagnostic page by going to http://brightsign-[SERIAL].local or simply using the IP address.

Diagnostic web server on the device.
Create a New App (Presenation)
To create a "Full screen HTML presentation" in BrightAuthor:connected, create a new presentation and select Single Zone HTML. Then, select a destination to store the generated files and point the Local Content to the index.html in your app's build directory. For Svelte, this is typically [your-app]/public/index.html. The author software automatically copies all dependent files (e.g., js, image, css). Click start to create the presentation.
It's important to change the paths to relative in your index.html (e.g., src="bundle.js" without a trailing slash). Otherwise, the app won't load because there is no local web server running on the device.
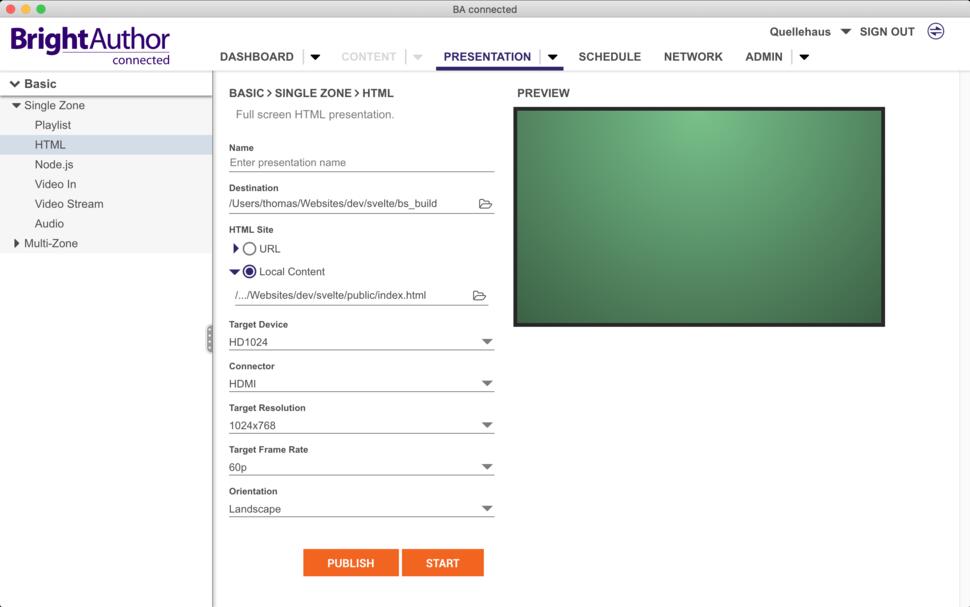
Create new presentation in BrightAuthor:connected.
After creating the presentation in BrightAuthor:connected, you need to configure some settings for the HTML zone. Go to the Content tab and click on the HTML zone. In the right column, check the State Properties section. To enable remote debugging in Chrome, make sure to select the Enable JavaScript console option. If your app is interactive, you can also enable mouse and touch events. For better video performance, enable native video playback if you use HTML5 videos. Next click Publish to get to the Schedule screen.
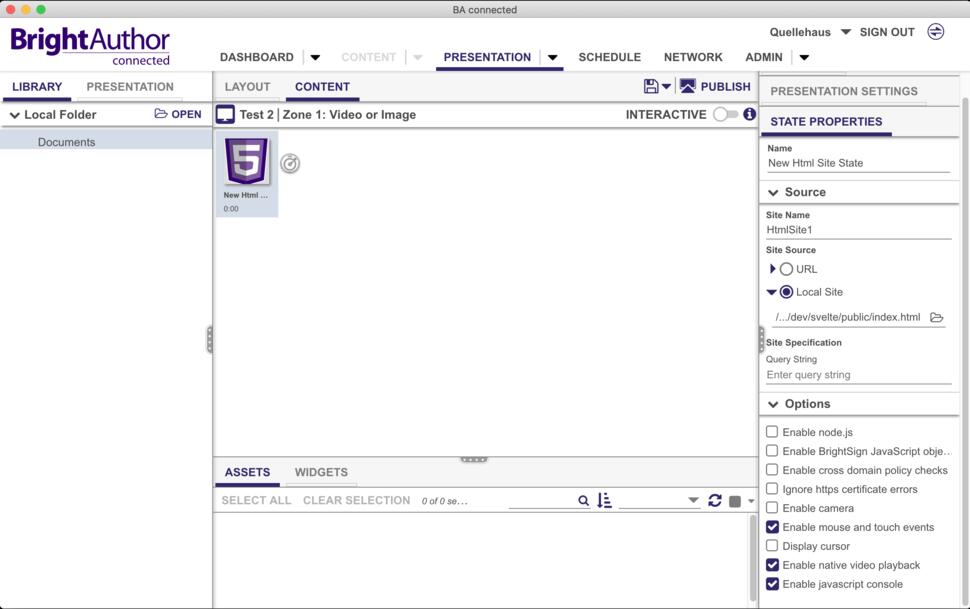
Enable touch events and javascript debugging.
In order to connect your player via a local network and actually publish (deploy) your application, you will first need to add the player's IP address. Select the Local Network type on the left, click the plus button and enter the player's local IP address. You can find the IP address on the device's diagnostic page.

Add device via IP from local network.
Your device should now appear in the Networked Units list. Select your device and press the Publish button. The authoring software will copy your app directly to the device's SD card. This includes all files such as js, images and videos. Upon completion, your app should be visible on the device.
Chrome Remote Debugging
Using the Chrome remote debugger can be very useful to test your app on a real device. It is important to use the same version of Chrome on both your local machine and the device you are testing on. You can find the version of Chrome on your device in the firmware release notes available on the BrightSign downloads website.
The BrightSign Documentation "HTML Best Practices" provides detailed instructions on how to connect your local Chrome browser for remote debugging. The documentation also includes download links to older versions of Chromium for OSX, Windows, and Linux.
To connect your local Chrome for remote debugging, download and open the appropriate version of Chromium. Then, go to the DevTools devices page by entering chrome://inspect in the URL bar. Click on Configure and enter the local IP address of the device. Finally, add the new device and click on Inspect to start debugging your app.
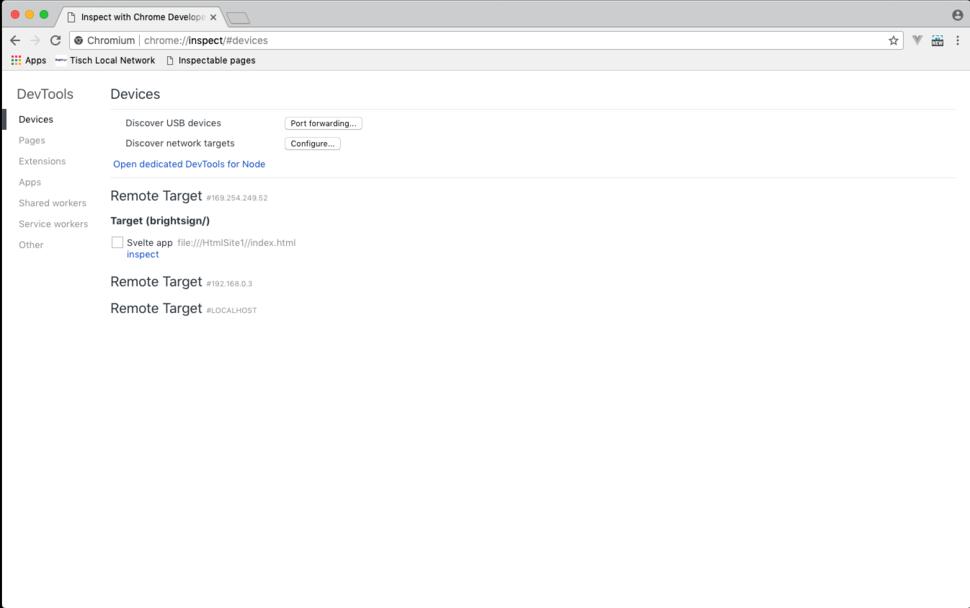
Add remote device in Chrome debugger.
The developer tools should now show the application in progress, as in local development. To see the GPU memory usage and the current frame rate, activate the FPS Meter (Frame Rendering Stats in newer Chrome versions) in the Rendering options by pressing `Esc' and clicking on the 3 dots menu on the left.
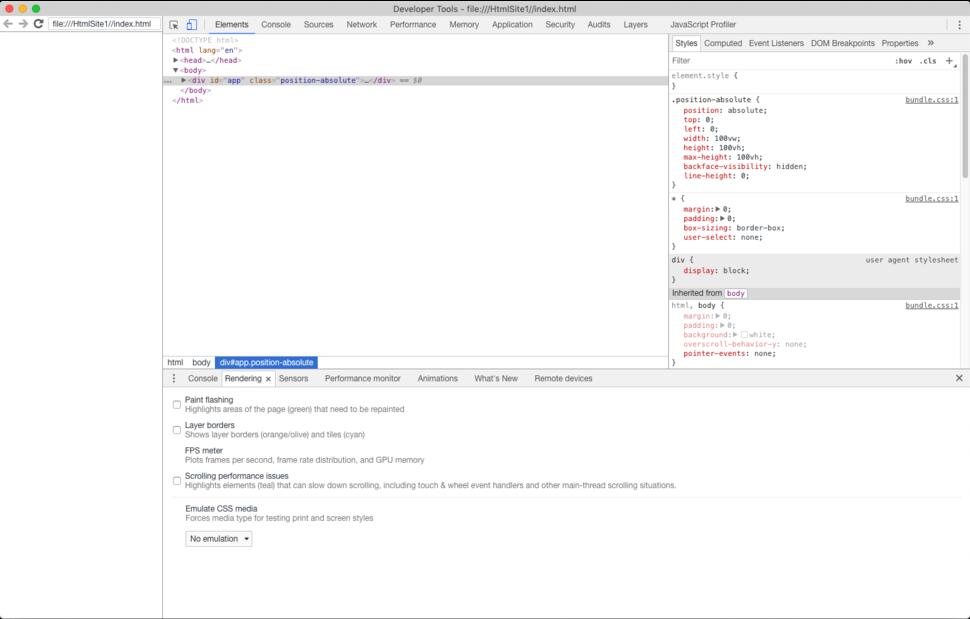
Remote debugger showing the app.
General Development Learnings
While you can use vanilla JS, it's worth considering using a JS frontend framework for building the app. After testing various frameworks on the BrightSign device, I found that Svelte (without Kit) provided the best experience and outperformed them all in perceived performance, probably due to the absence of a virtual DOM. For simpler applications, using vanilla JavaScript could also be a viable option. To learn more about the limitations of different BrightSign players, the "HTML Best Practices" section in the BrightSign documentation is a good starting point.
Develop Local, Test on Real Device
Once the initial setup is complete, you can start to develop locally in Chrome. It's important to use the same Chrome version as the player, as it may be outdated.
In the Chrome dev tools, set up a custom device under Emulated Devices with the dimensions of the (touch)screen you are using. Set it as Mobile to emulate touch events. In addition, set the CPU throttle in the Performance tab to 4x slowdown. This will reflect the lower specs of the player and you will be able to detect performance problems at an earlier stage in the development process.
Remote debugging on the actual device is essential to check for memory usage and memory leaks, which should be identified as early as possible for easier resolution. Whenever a new feature is developed, you can use the Publish button in the Schedule tab of BrightAuthor:connected to test it on the real device.
HTML and Positioning
Digital signage apps are typically designed for a specific screen size, so they do not need to be responsive. Instead, absolute positioning is recommended to prevent reflow or layout trashing, which can cause performance issues. Absolute positioning also saves time when transforming a screen design into HTML, as you can directly measure positions from the design file.
HTML vs Images with "Touch Zones"
Most digital signage applications have some kind of menu and different content pages for text, images, audio and video. If a menu or page is only text and images, you could export the page as an image from the design file and place it in a scrollable container. Touchable/clickable areas, such as for opening a page, can be added by overlaying invisible, clickable zones.
In my tests on a 768p screen, there was no visual or performance difference to recreating the design in HTML.
Using images in scroll contaner for content.
According to the documentation, the maximum image size for the HD player is 2048x1280x32bpp. However, during my tests, I did not encounter any issues displaying JPEG images with larger resolutions, such as 1024x10450. This may be due to a lower bpp.
However, I did experience performance issues when displaying images with a height greater than 16,000 pixels. The scroll performance became sluggish, although the memory load was not abnormal. This behavior may be related to Chrome, and may not occur in newer versions. Therefore, it is important to test for this issue on the BrightSign player.
Additionally, on screens larger than 768p, using the "image with touch zones approach" may be problematic, depending on the BrightSign player hardware being used.
Fetch Local Content
The BrightSign player loads the index.html file using the file:// protocol, without involving a local web server. As a result, it's not possible to fetch local content, such as HTML content, using an Ajax request. (it's possible to start a local webserver with node.js on the player but I haven't tried)
In one project I had content that was more interactive, so I've created the pages as real HTML. Since I couldn't load the content with fetch, I worked around this by putting the HTML for each page in a separate .js file. Each file references a global pages[] array which holds the HTML as a string. The file is inserted into the <head> section of the index.html file. This way the HTML content is separated from the svelte component code, but could be used by the application via the global pages[] variable.
Display Audio and Video
You can use standard HTML <audio> and <video> tags to display audio and video on the BrightSign player. The playback events such as playing and ended work as expected. To achieve optimal video playback performance, it's recommended to use the player's native playback option, which utilizes the hardware to render the video.
<video
  hwz="z-index:-1"
  x-bs-intrinsic-width="{width}"
  x-bs-intrinsic-height="{height}"
  ...
></video>
For information on which video formats and codecs are supported by the BrightSign player, take a look at the documentation on HTML Video.
To ensure a good user experience on low-spec devices, perceived performance is key in addition to the actual design. These findings are based on observations from using the HDx24 player connected to touch screens with resolutions of 768p and 1080p. This type of player has 256MB graphics and 128MB JavaScript memory, but its Chrome instance can only allocate up to 128MB graphics memory (see GPU Limitations).
I've experimented with dynamically adding and removing the src property of the <img> tag when an image enters the viewport. There was no significant difference in memory usage and performance once the image was loaded. However, preloading images before displaying a single page might be a good option.
Using requestAnimationFrame in conjunction with triggering animations can prevent stuttering at the beginning of an animation. Remember to always use cancelAnimationFrame to prevent memory leaks if a component is removed before the request is called.
Throttle and Delay Functions
It's recommended to use a throttle function when calling functions on events such as scroll. This helps to prevent the function from being called too frequently, which can lead to performance issues. The amount of throttling required will depend on the specific use case, and experimentation is required to find the optimal balance.
In some cases, it can be helpful to delay function calls. For example, if you are manipulating the DOM immediately after an extensive page transition, it can be helpful to delay the DOM operation for a few milliseconds (100-500) to avoid stuttering and ensure a smoother experience.
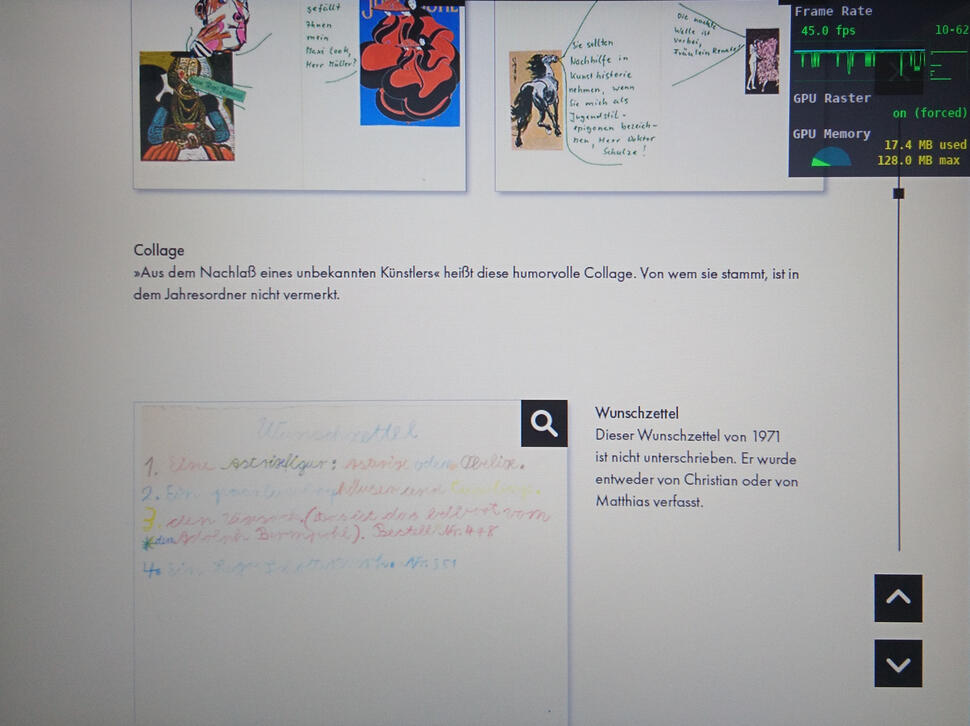
In the video, a delay can be seen after clicking the magnifying glass before opening the zoom image. This is because the image is quite large and needs time to load completely. Without the delay, the image would load while the opening transition is running, causing stuttering and frame rate drops.
Example of delay usage in app.
GPU Limitations
It's important to note that the BrightSign players have limited hardware resources, like many embedded devices. For example, the HD1024 player that was used for all the projects has 256MB of graphics memory and 128MB of JavaScript memory. However, the Chrome instance on the player can only allocate 128MB of graphics memory.
If your app exceeds any of these memory limits, the player will crash and restart.
To avoid these issues, it's important to monitor the memory consumption of your app using the Chrome remote debugger. You can enable the performance meter to help you identify any potential memory issues. (see Chrome Remote Debugging)
Show GPU memory on device screen.
Running out of GPU Memory
The app shown in the video runs on a 1080p touch screen and includes an intro map with an animated SVG graphic and content pages rendered in HTML. It features a complex fullscreen transition from the map to the content pages and horizontal sliding transitions between sub-pages.
App with fullscreen transitions.
At some point during development, the application crashed and restarted randomly. After a lot of debugging I found that the browser's GPU memory was always maxed out just before the app crashed. This was particularly the case during fullscreen transitions. This is because the browser uses the GPU to transition CSS transform.
It turned out that in order to get a smoother scrolling experience, I had set will-change on the <div> sub-pages. While this resulted in better scrolling, it also resulted in more overall GPU memory usage, which crashed the application.
While will-change and translateZ(0) are commonly used to fix scrolling issues, they essentially force the browser to render elements on GPU layers, which increase GPU memory usage. (check out CSS GPU Animation: Doning It Right)
If you are planning extensive fullscreen transitions and/or animations on screens equal to or greater than 1080p, you should consider using a device with more memory, such as the XT models.
Memory Leaks
Digital signage applications are expected to operate continuously without any browser refreshes. As a result, it's important to ensure that your application doesn't have any memory leaks or unhandled errors.
One way to check for these issues is to use the Performance Monitor in Chrome's developer tools. This tool displays memory usage, number of DOM nodes, and event listeners over time. If any of these values consistently increase, it's likely that your application has a memory leak that needs to be addressed.
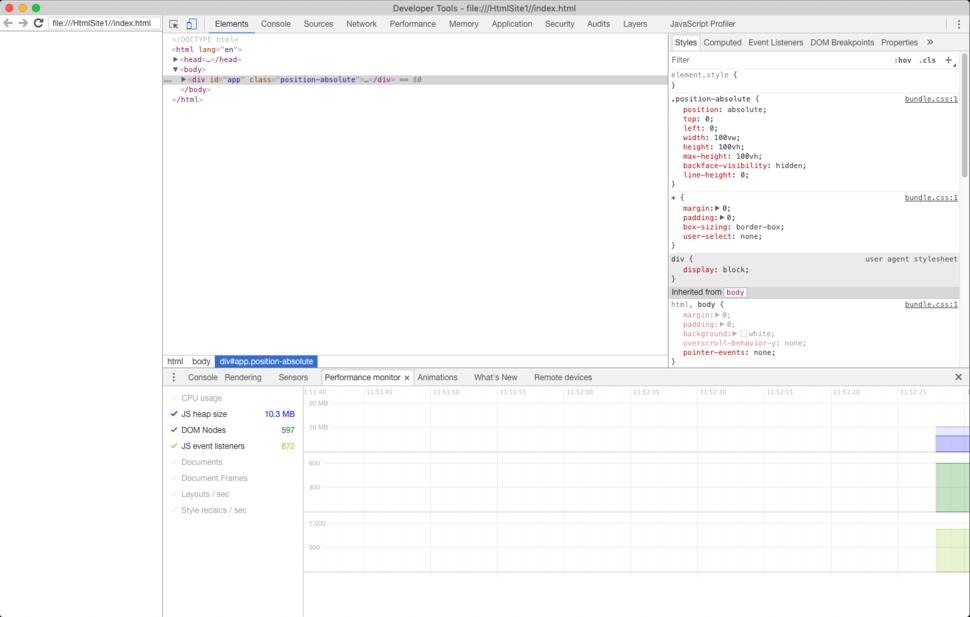
Performance monitor in Chrome dev tools.
To locate the cause of memory leaks in digital signage apps, you should first attempt to isolate the problem. In local development, ensure that all browser plugins have been disabled. Then, reload the page and manually invoke the garbage collector by clicking the trash icon in the Performance tab. Proceed to perform a single action, such as opening a sub-view, closing the view, and invoking the garbage collector again. Finally, check if the number of DOM nodes and event listeners is the same as before the action.
Most memory leaks occur from detached DOM nodes. These are nodes that are no longer part of the visible DOM, but are unable to be garbage collected due to references from other variables or objects within the code. This can be caused by references to or from global configuration objects or unremoved event listeners.
It can be challenging and time-consuming to identify the root cause of a detached DOM node.
Check for
- unremoved event listener
- proper use of cancel events like
touchcancel, cancelAnimationFrame
- references to global objects like a config object used as a component property
If the memory leak still occurs
- test view components in isolation
- enable one feature at a time in a code state where no leaks occur
- use diff between two heap snapshot
- use Edge for finding detached DOM nodes
Monkey Testing
Digital signage applications are often used in public spaces. This means that some people may try to break your application. To test for the user story "I'm a bored visitor and I want to break the app so I'm less bored" you can use gremlin.js.
A monkey testing library written in JavaScript [...]. Use it to check the robustness of web applications by unleashing a horde of undisciplined gremlins.
It's easy to set up, and it's fun to see how the app and player perform while a horde of gremlins touch your app with their virtual fingers.
Final Thoughts
I hope you found this article useful and informative for developing applications for BrightSign players and other low-spec embedded devices. It can be a lot of fun to work on these types of devices and I've personally learned a lot about performance, memory leaks, and GPU rendering in the browser context.
In the future, I'm excited to test and compare the performance of devices from other manufacturers and explore the possibilities of using GPIO ports on the player to add hardware interactions and create new interactive experiences.
If you're interested in having an app developed, feel free to contact me. I'm available for freelance work.